
March 2003: Emerald ECU Part 1
The Emerald ECU is probably one of the most complex modifications under taken on the Tiger so far and so I split this down into various sections.
Preparation
The reason for fitting an electronic ECU is primarily to improve the low speed engine running and possibly the fuel comsumption. Not that the fuel consumption is an issue (19mpg is just affordable) however when you only have a 5 gallon tank long trips to Lincolnshire are taken with a large petrol can strapped to the passenger seat! There are several different programmable ECU's on the market all having various advantages and disadvantages although a couple of points steered me towards Emerald:-
A very good book published by Dave Walker (owner of Emerald)
Various other Tiger owners have fitted these successfully Neil Wain, Richard Appleby,Ian Martin (although his is an Escort Mk1).You can actually talk to the people behind the company. And finally Emerald are moving from Brixton to Watton (60 miles from me!)
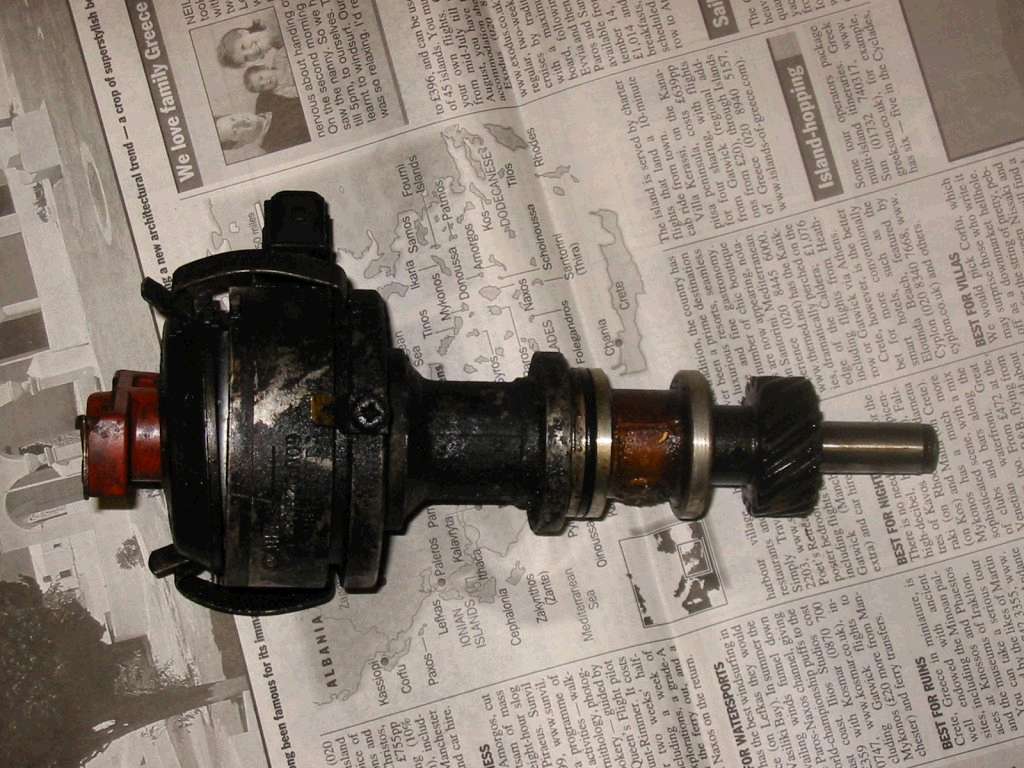
Once I had decided on this the unit was ordered and the real work could begin. First I had to obtain a new dizzy which does not have a mechanical advance function. The standard Sierra distributor has a set of advance weights which alter the timing as the engine speed increases. However if you used this with the ECU then the ignition timing would be all over the place as the ecu and distributor would both be trying to do the same job.
The new dizzy cost me a fiver from a local engine builder a bargain.
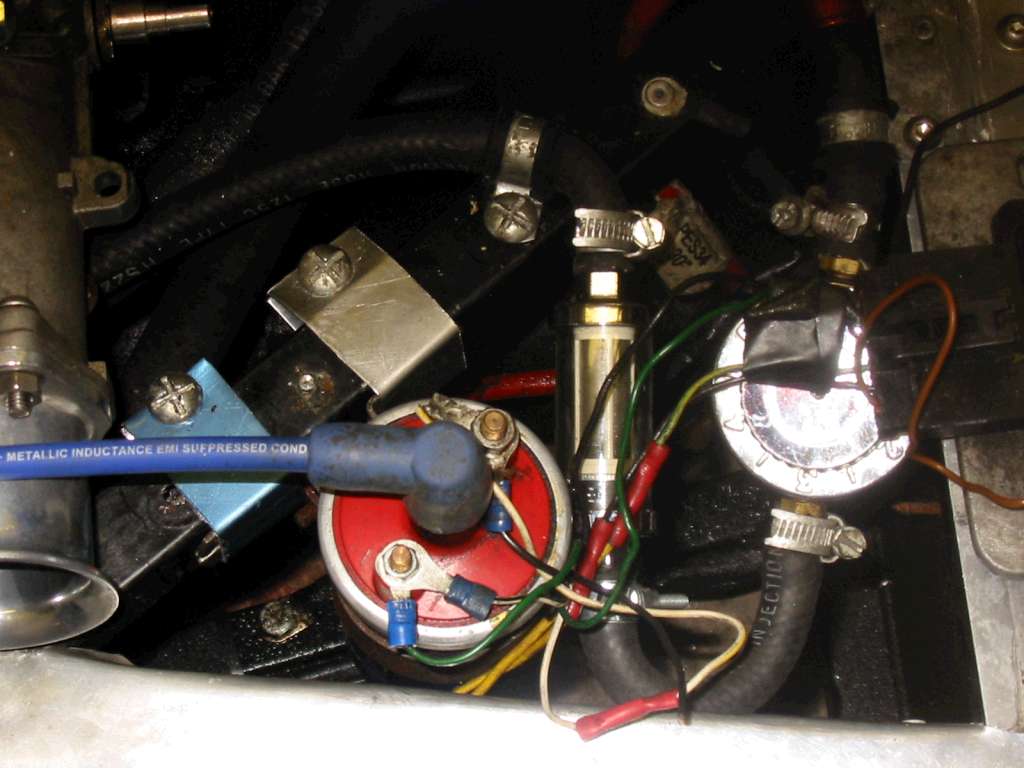
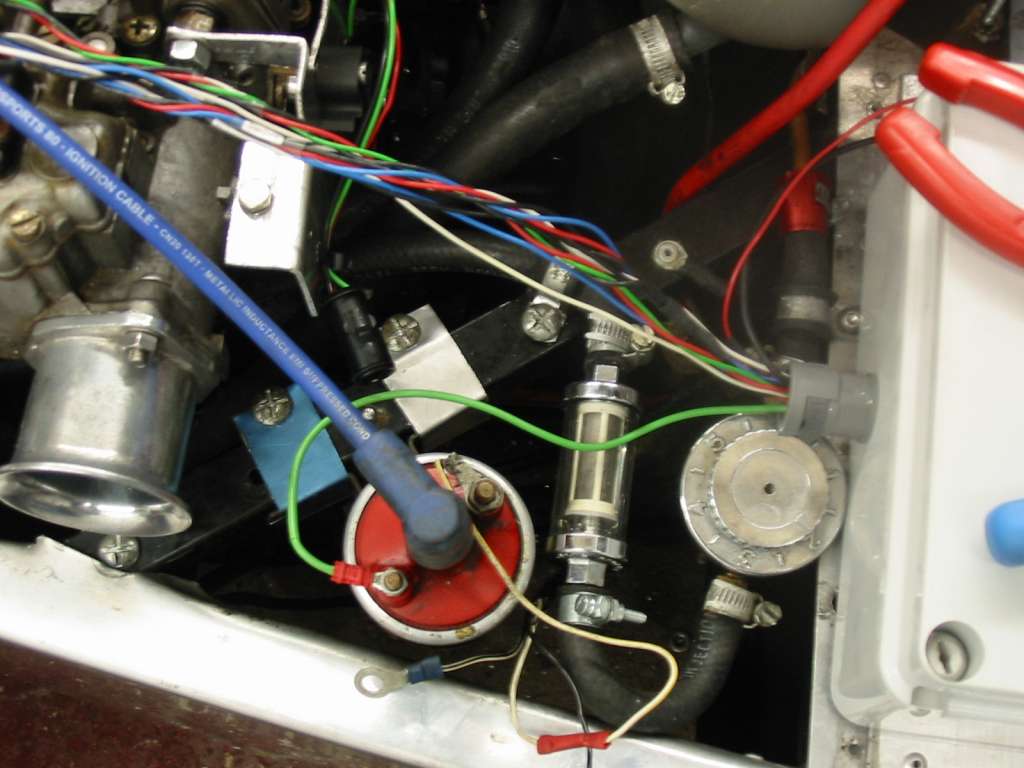
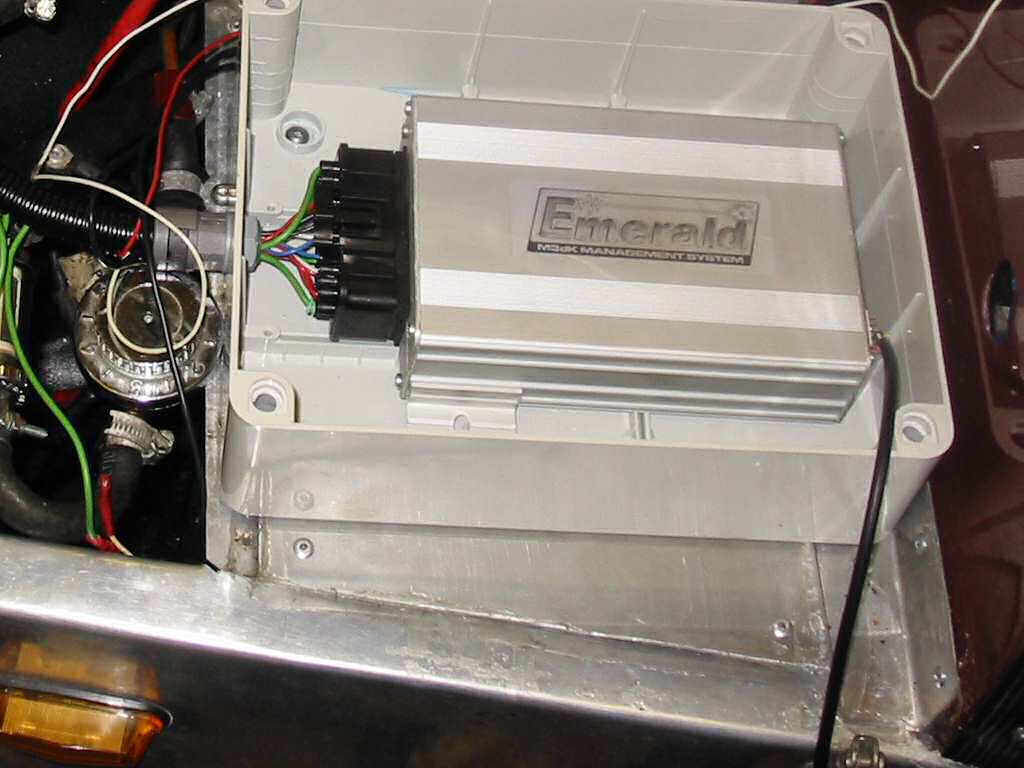
The next job was to obtain a suitable enclosure for the unit (if you look back at the section Heater removal you will see the work needed to prepare the space for the ECU enclosure). The enclosure is an IP65 junction box with a hole at one end for a cable gland. Because of clearance in the case the programming lead has to be permanently attached to the ecu and coiled up inside the enclosure.
Fitting
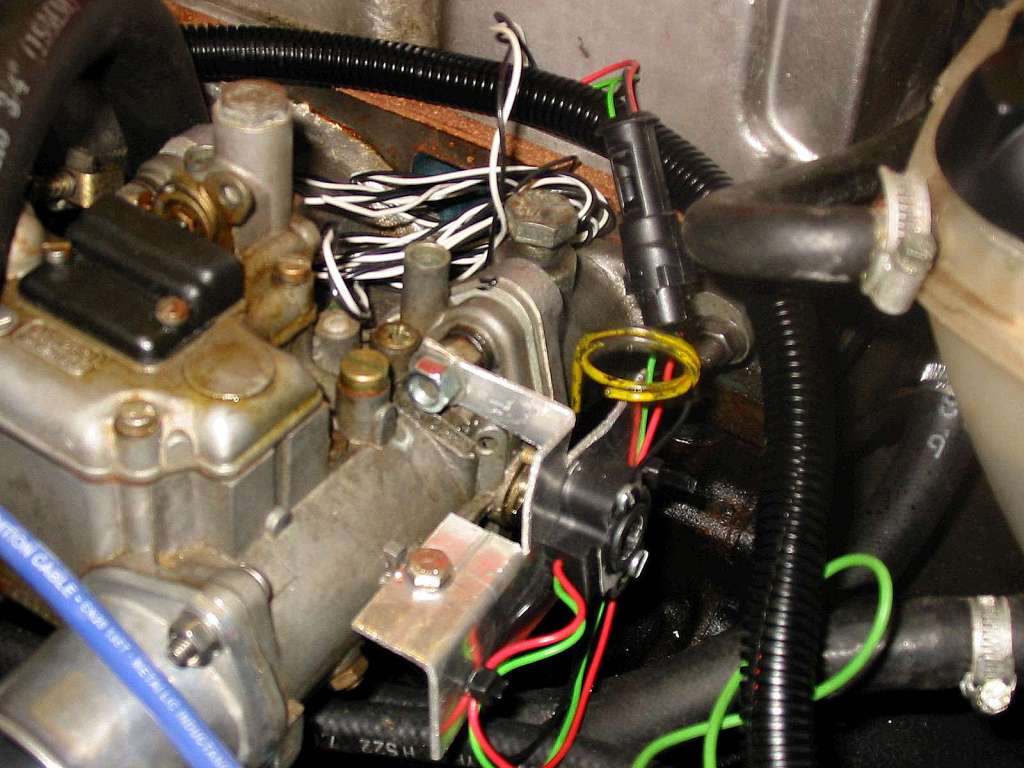
The fitting of the ECU is fairly simple as all it needs is a suitable speed signal (in my case supplied by the replacement distributor) and a throttle position sensor. The bracket is constructed from a single piece of aluminium bent into shape and bolted to the carburettor with the position sensor held on using two machine screws and a pair of rivnuts.
The replacement distributor was literally a drop in item - having made sure that the engine was locked at TDC before removing the old unit so I had a reference to work from.
Once the wiring had been made I connected up the office laptop to the ecu installed the software and set about getting it started. The first stage was to calibrate the throttle pot against full throttle which was easy, I then programmed the basic settings (distributor trigger, 4 cylinders etc) and looked ready to start the engine.
The first couple of attempts at starting produced no reaction from the car at all, until I noticed that every time the car started the Laptop said the ECU had disconnected itself. Further investigation found that the "accessory" terminal on a Ford ignition switch is disconnected when the engine starts. Not the best idea for an ECU! After rewiring the system did stay live when starting but the car still wouldn't read the engine speed.
Now at this point I had a problem - obviously something was wrong with the pickup in the dizzy, however what was wrong it could be either the power supply to the sensor or the sensor. The easiest option was to get a replacement dizzy from a scrapyard which I did - however this had seemed to have the same problem. I had a sudden flash of inspiration and phoned a friend (Neil W), he turned out to have come across the same problem. It appeared that the sensor was not obtaining enough power to operate, the solution was to run a new 12V power line to the sensor, with this done the ECU picked up the engine rotation and fitting the distributor cap resulted in the engine starting.
The next stage was to calibrate the ecu to the engine by locking the advance at a known value and moving the dizzy to match the marks on the timing wheels. So at this point the engine runs but the engine bay looks a complete mess, the cables are being tidied using a length of split flexible conduit. This is wonderful stuff all the cables are fully enclosed but the casing can be opened up to insert or remove cables as required. Once all the tiding up has been done the next stage will be to take the car over to Emerald to be rolling road tuned.
Pictures of installation
|
|
|
|
March 2003: Emerald ECU Part 2
Once the Sump had been refitted and tested it was time to sort out the rest of the system and ensure the car became useable once again.
There are several items that whilst not essential to the ECU's operation are nice to have so I have fitted them anyway!
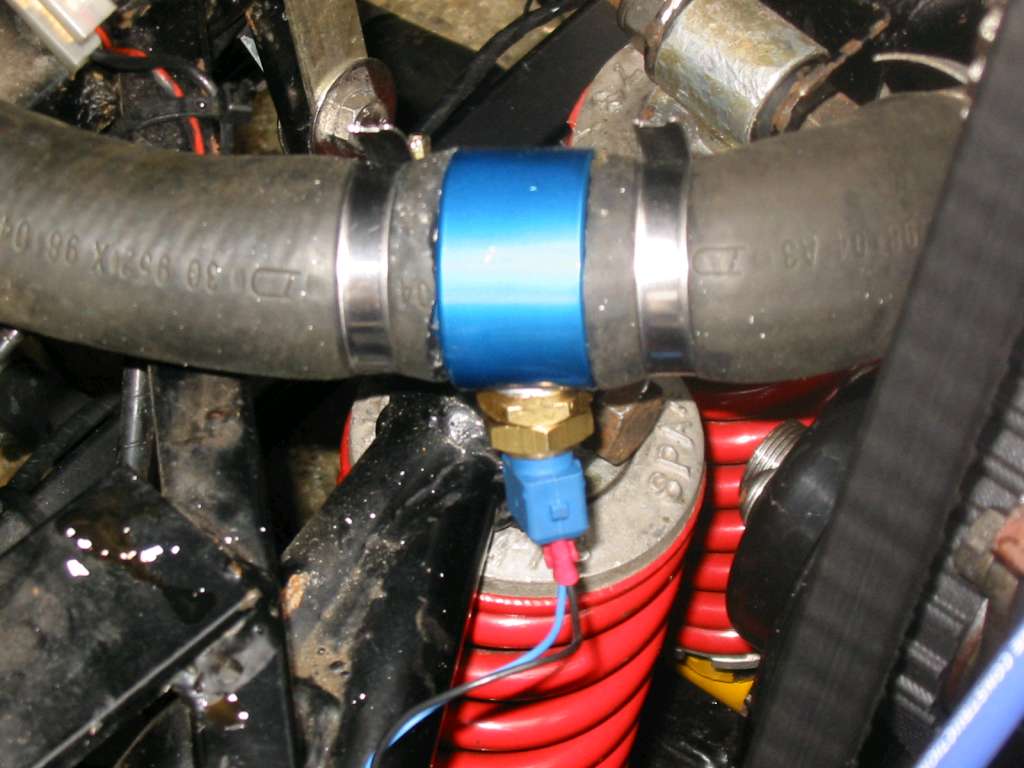
Water Temperature Sensor
This is one item I would fit regardless of any other advice given. The ECU will detect an overheating engine and shut down the system until the temperature is safe again.
The sensor is supplied from a company called Fuel Parts UK and is a Bosch unit part no. 82033. A word of caution if you ring this company up to order anything ask for the number of their local dealer. If they have a nearby dealer the order needs to go there instead of directly to them.
Fitting
In order to fit one of these sensors you need a suitable adaptor to allow it to be fitted into a water pipe. Now when I rang the supplier I was told that the sensor used a screw thread of M10x1. Armed with this information I rang Burton Power and ordered an appropriate fitting from their catalogue. However the sensor would not fit as it has an M12x1.5 screw thread instead. Why do I trust suppliers?
The above meant that I spent a Saturday morning hunting for a suitable tap to allow me to redrill the hole in the adaptor to take the sensor. Once this had been done it was a simple job to cut and shut the water pipe round the fitting and refill the cooling system.
Finally I terminated the cables from the ECU wiring loom to the sensor plugs - hopefully I haven`t wired it the wrong way round as there weren't any clues on the module!
|
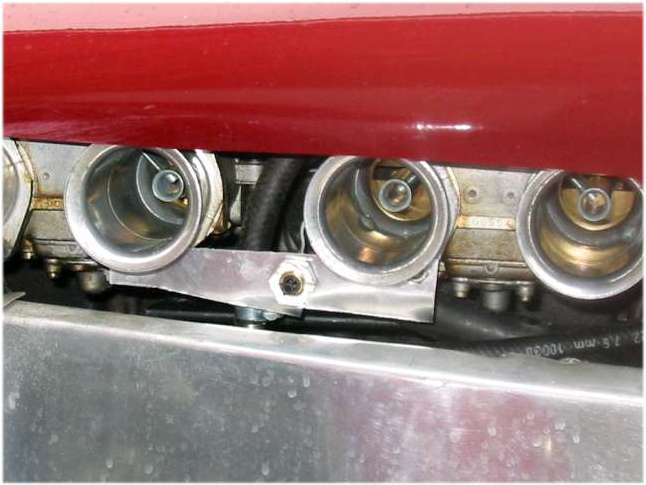
Air Temperature Sensor
This is probably not needed for a carb equiped car - but as it is driven in the winter will probably have some effect.
The sensor is again supplied from Fuel Parts UK and is another Bosch unit part no. 82045.
Fitting
In order to fit this sensor you need a suitable bracket to allow it to be mounted near the trumpets of the carbs - but not in the "wind chill" zone outside the bodywork. A simple piece of ally with a couple of holes drilled sorted the mounting out.
Finally I terminated the cables from the ECU wiring loom to the sensor plugs - hopefully I haven`t wired it the wrong way round as there weren't any clues on the module!
|
Shift Light
Well, Why not fit it as the ECU supplies a suitable control signal!
The shift lamp was ordered from Burton Power and came as a complete unit with a blue LED and a suitable resistor already fitted in the housing
Fitting
Fitting this is simplicity itself. First find a suitable 12V supply to power the lamp, next connect that and the ECU wires to the lamp housing and secure the housing in place.
With all of the above fitted it was now possible to take the car off the ramps where it has been sitting for the last month and out of the garage under it's own power.
Jobs still to finish off
Unfortunately there are still some jobs to be done to finish the car off completely.
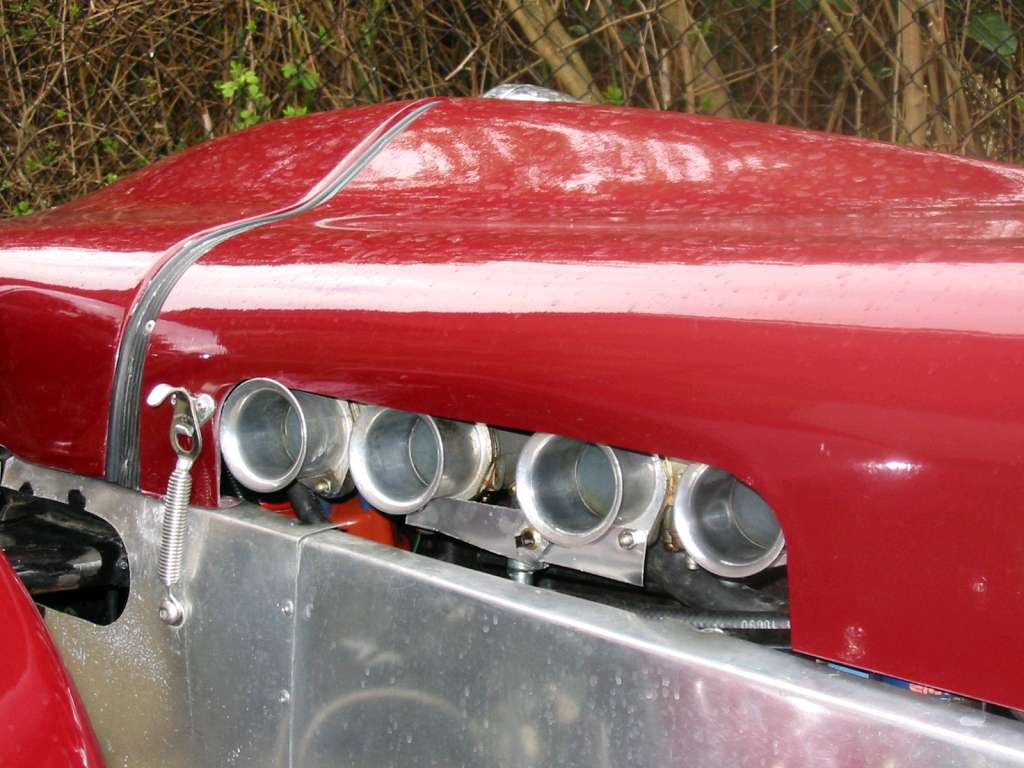
Also I didn't realise that the air temperature sender would be so visible through the bonnet vent and the bit of scrap ally it bolts to could be of better quality!
|
|
I also need to test the shift lamp and then mount it securely - at the moment it is loose on the dashboard in case there is a problem with the wiring,
The car has now been taken for a quick road test and seems to be behaving at low engine speeds - however above 3500rpm it is noticably pinking so a rolling road session and a remap to the ECU is in order.
April 2003: Emerald ECU Part 3
Slight Problem
10th April
This was the first real drive after installing the Emerald, although I hadn't planned on driving the car that day I had a phone call from my brother saying he'd missed the last bus home and could I go and pick him up.
I decided to take the Tiger and give it a quick test - the total distance was just over 5 miles and shouldn't have been a problem.
However I got the car out of the garage and drove down to pick him up, meeting him without any problem, I then turned round to go home and went back onto the main road, or at least that was the plan. The road I was driving on has a sharp dip in it and on coming out of the dip the engine just died leaving me on a slip road to a roundabout. I stopped put the hazard lights on and lifted the bonnet, the only obvious problem was the king lead from the distributor to the coil had come loose, so I refitted this and tried again - the engine was still dead. I then opened up the cover to the Emerald and tried again - on the back of the ECU is a light which tells you that the module is seeing engine rotation this was stubbonly remaining dark.
There now appeared to be a major fault on the ECU or the sensors, getting ready to call the RAC, I glanced over the roundabout and saw an RAC van on the other side. So I did what any sensible(!) person would I sent my brother with my card over to see if he could get some help. Luckily the patrol agreed to help and I managed to get a tow back home - only 3 hours after setting out on a 10 minute drive.
With the car back in the garage and a laptop plugged in the fault became apparant I had blown the sensor in the distributor presumably when the lead had come loose. I also solved the problem with the lead by rerouting it under the carbs instead of over them as this gives more slack on the cable.
Looking back at the to do list on the previous page (Emerald Part 2) I have so far managed the following:
Both the temperature sensors have been checked and calibrated
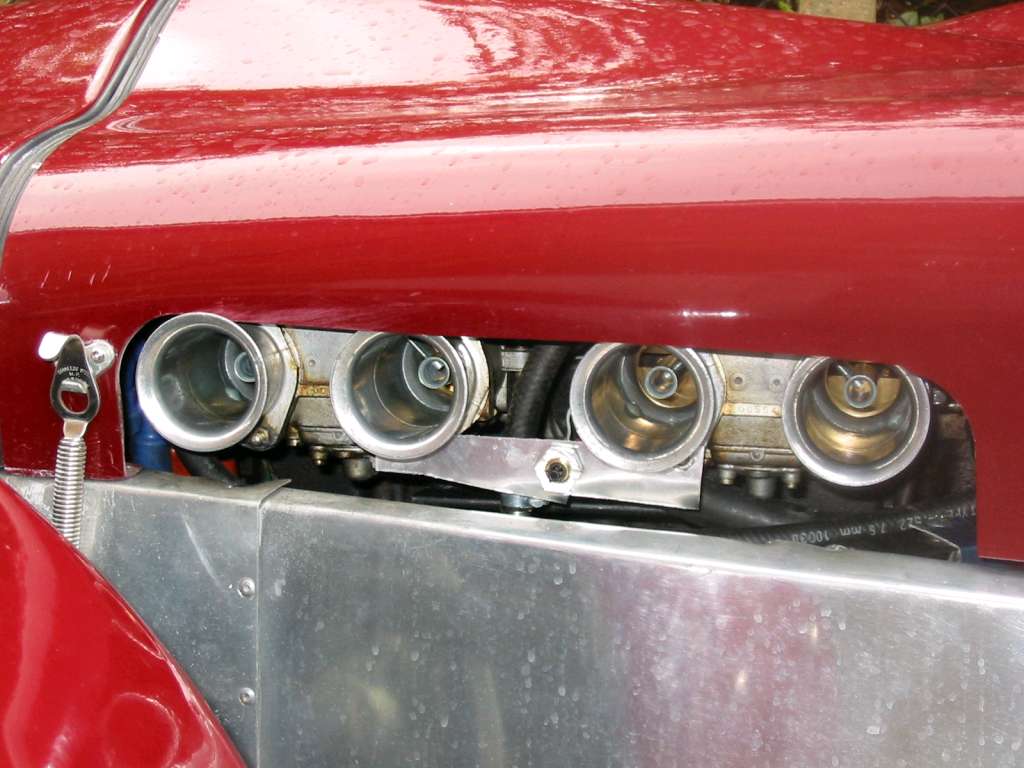
The bonnet hole has now been suitably reprofiled to clear the carb trumpets and avoid any vibration problems.
I still need to remake the air temperature sender bracket.
The Shift light has now been checked as working - by telling the ecu to switch it on at 2000rpm! and just needs securing.
However, I also need to look at fitting a throttle pedal stop and reworking the exhaust mounting to stop it trying to melt the rear wing!
Now at the time of writing the car has been for the rolling road with some very interesting results which you will find on the next page. However I thought I would detail a bit more on the above problems that were still to be rectified.
Throttle pedal stop
Well I can't really take the credit for this one as I copied the idea straight out of this month's Which Kit by using a spare M12 bolt and a couple of washers. Once you have worked out where to drill the holes then it is easy!
Exhaust mounting
Well this caused a bit of a problem due to the replacement of the standard Tiger can with the raw unit I had the unfortunate effect of the exhaust exiting directly onto the rear wing which was starting to look rather worn (it already has a few chips and stone cracks on it and this was making it worse).
The solution was to make up a bracket which bolted to the existing mounts, bent over at 45 degrees and then bolted to the exhaust. This had the effect of making the tailpipe point below the rear wing and will hopefully prevent melting!
Scuttle repanelling
Well I think this solution comes under the description "sledgehammer to crack a peanut" for the work involved. If you look on the picure below there is a small hole visible in the scuttle panel. Although the photograph is not at a very good angle, it turns out I don`t have a better one!
|
Anyway this hole seems fairly insignificant or at least it did until I was driving home from a computer fair in the rain and with a nice shiny new hard drive in the passenger footwell getting wet... Fortunately it was in a sturdy cardboard box.
Now there are various ways of sealing a hole :- blanking grommet, patch panel, masking tape etc. But in this case the hole and whatever I choose to patch it with are visible as soon as someone takes the bonnet off.
So with this in mind I went slightly over the top, out came the battery, emerald enclosure, and everything else on the shelf and a new panel was carefully made from a sheet of ali to cover the front of the scuttle from the outer edge up to the pedal box cover.
Once the panel had been shaped to fit, It was then drilled, riveted and sealed in place, and 4 hours after starting I had succeeded in blocking that little one inch diameter hole.
May 2003: Emerald ECU Results
Emerald Results
Today was a very important day for the Tiger. It was taken to Emerald for the ECU to be mapped and hence the car should run a little better. On the way down the car was spitting back through the exhaust and occassionally through the carbs as well. This was partly due to a leak on the collector, and mostly due to incorrect map settings!
Once we had arrived (my dad being a sceptic on the Tigers ability to go more than 50 miles without breaking down, had followed me in the SAAB) there was already a car being tuned on the rollers. As it was noon we decided to nip down the road to the Chequers in Thompson and enjoy a good meal - I can recommend the gammon steak if only because after eating that you don't feel hungary for the next 6 hours!
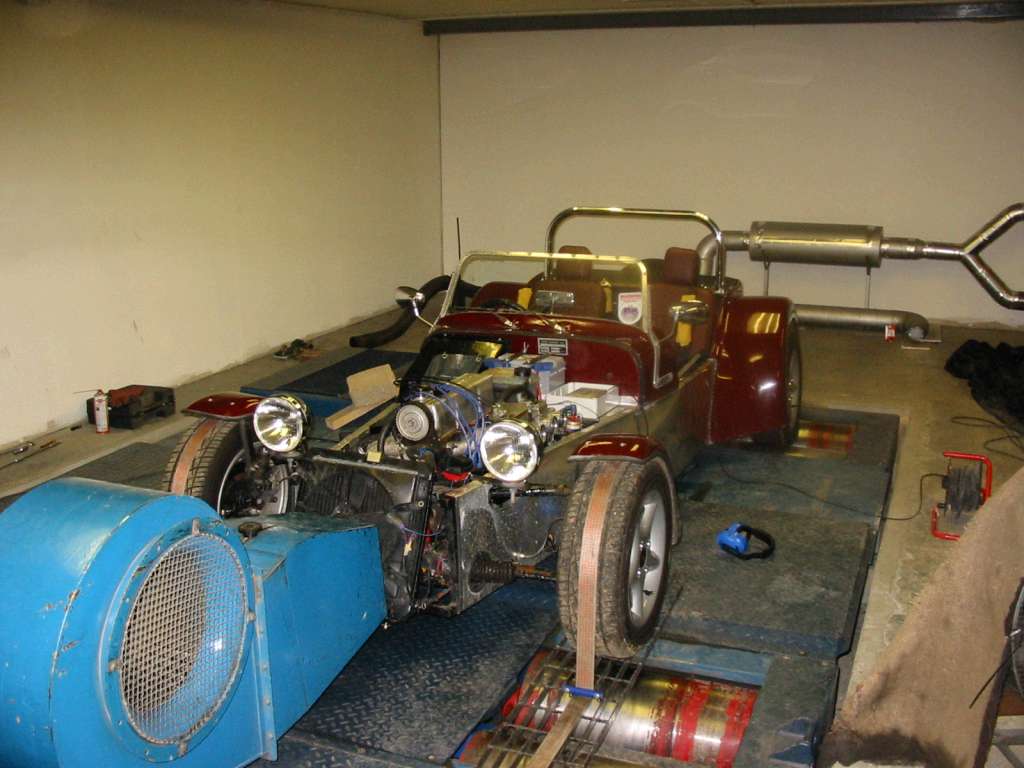
When we returned at 1:30 the other car was still on the rollers and we had some more waiting to do and eventually my car got onto the rollers at 3:15. Once the nosecone and bonnet had been removed it was possible to start.
The mapping seemed to go fairly well, but Dave Walker wasn't happy with the figures he was having to put into the car to make it run, as they were in the wrong range. This was eventually tracked down to a problem when setting up the TDC position on the crankshaft, once that had been corrected, then problem moved because the electrical pickup on the dizzy was rubbing on the cambelt!
This is probably a useful tip for anyone else looking at a tuned engine. The camshaft and crankshaft pulley positions are critical in relation to each other, however the distributor/oil pump drive isn't. So we slackened the cambelt and moved the distributor drive to give us some clearance, once this had been done the timing had to be reset (again) and we could continue.
By this point it was about 5pm and once the mapping had been completed a power run could be attempted. The car was run up to full speed and when the engine hit 5500rpm all the power vanished. Help! This meant we had a worried looking Dave wondering what had happened.
At first we thought it was a plug failed (no).
Then tried a compression test (all fine).
Tried using Easystart (no change).
Had the cam cover off in case a rocker had come loose (all valves OK).
Finally I noticed that the bolt blocking the vacuum takeoff had vibrated loose, once this had been replaced everything went fine.
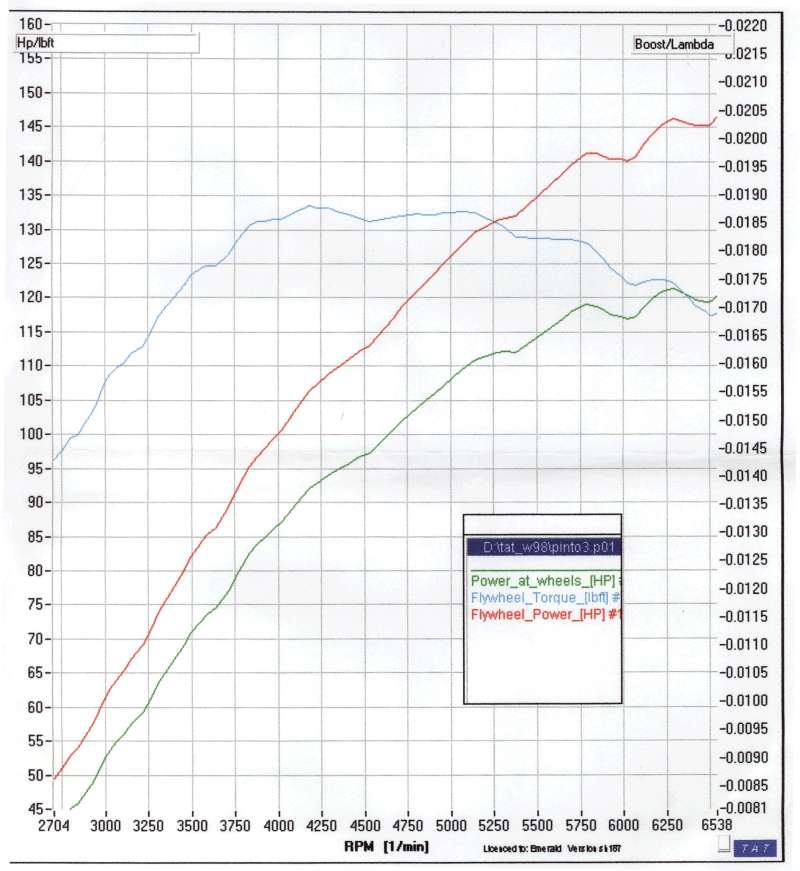
Once this had been rectified a power run was done 146bhp at 6500rpm, 133 ft/lb torque at 4300rpm
|
Here are the results from the Emerald Tuning.
|
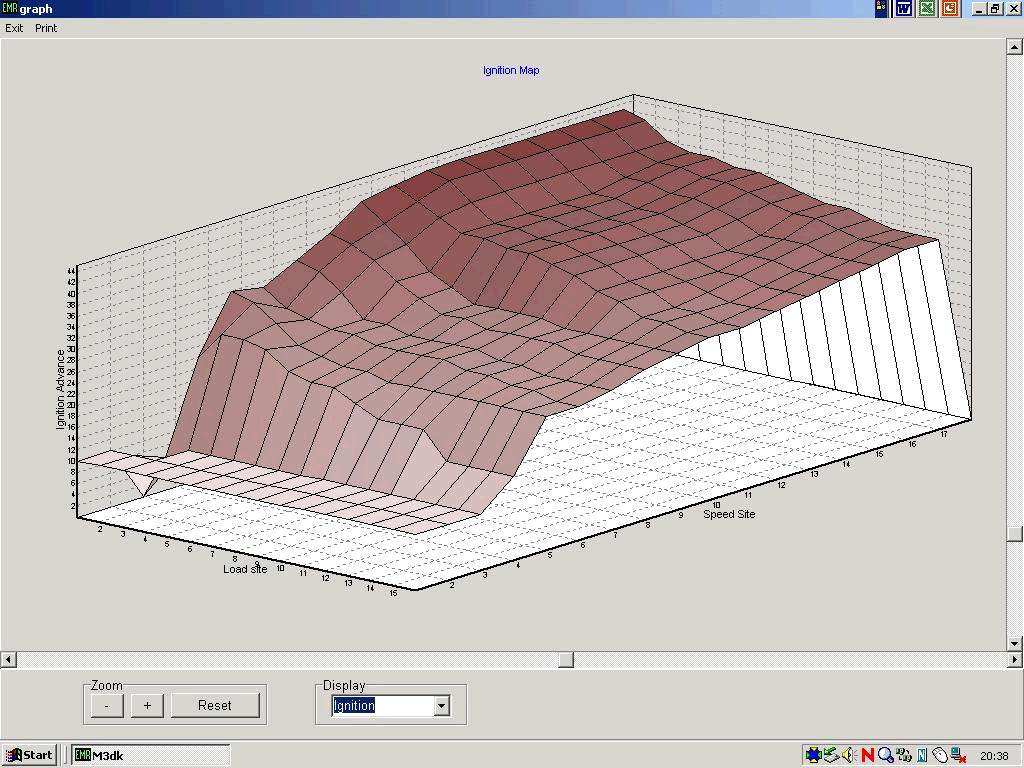
Standard Pinto Ignition Map as supplied with Emerald ECU |
|
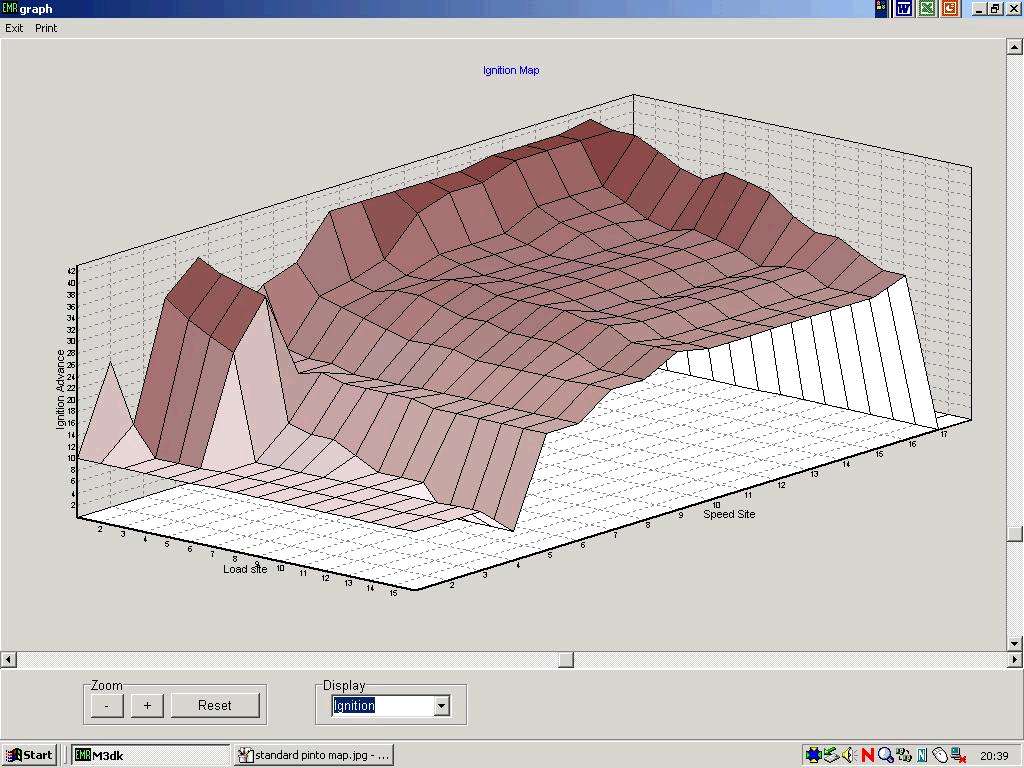
Modified Pinto Ignition Map after rolling road session |

|
Download map by right-clicking and choosing Save target as |
|
Reproduction of power graph from rolling road session |